Written by 正冰 on 2009, July 4, 11:47 PM
今天感觉vps运行好慢,难道跟windows一样了,被我折腾久了就乏力,不过不应该啊,看下系统运行时间:uptime (090704整理)
[root@linuxserver ~]# uptime
23:38:14 up 6 days, 21:44, 1 user, load average: 0.00, 0.00, 0.00
重启系统:reboot (Linux系统启动还是比较快的,我的vps2分钟重新启动完毕)
[root@linuxserver ~]# reboot
Broadcast message from root (pts/0) (Sat Jul 4 23:41:17 2009):
The system is going down for reboot NOW!
当前用户:whoami (显示当前操作的用户权限)
[root@linuxserver ~]# whoami
root
其他后续边用边补
Filed under: 技术归总
0 Comments
16257 Views
Written by 正冰 on 2009, July 4, 10:37 AM
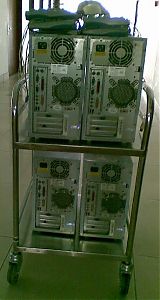
昨天又拿到4台实验机(联想启天2610/P4/256M/40GB),没办法,穷人只能用这批2002年的机器做实验了,见图:
今天开机后发现里面都内置了“联想硬盘保护系统 3.0”,如果不想动手拆机器的朋友请按照方法2处理。
方法1(喜欢动手的选择这个):
拿把螺丝刀打开机箱侧边盖子,拆下PCI卡槽里的PCI网卡(我拆下的这个网卡型号是RTL8139C),用工具将网卡上的还原模块拆下(图中右边贴有白色纸条的黑色模块)
重新将拆下了还原模块的网卡插回去,启动电脑,联想的还原功能已经没有喽!接下来可以直接正常地进行其他操作了
原本的256M内存实在是让我看不过去,跑个Linux我都感觉太对不起Red Hat,再加一根256M内存,昨天刚拿到的全新10条256M的DDR400用下(一根用掉,还剩9根)!
方法2(打电话):
- 硬盘保护系统1.0:在输入密码的界面按F10键,然后在按住ALT键不松手的情况下依次点击1、3、3,松手后再按住 ALT键并依次输入1、4、4, 松手后再次按住 ALT键并依次输入1、5、5,这时会得到一个串码告知800咨询员即可
- 硬盘保护系统3.0:在输入密码的界面按F10键, 然后输入ENPQ,这时会得到一个串码告知800咨询员即可
- 硬盘保护系统4.0:进入输入密码的界面,在按住SHIFT键不松手的情况下依次点击2、3、2、9,松开SHIFT键后点击F10键,这时会得到一个串码告知800咨询员即可
- 硬盘保护系统5.0:必须将硬盘保护系统卸载重新安装才可以,如果用户报修建议用户送到维修站处理,也可以按照软件进行派单,派单时提醒维修站带好硬盘保护系统安装盘
- 硬盘保护系统5.1:必须将硬盘保护系统卸载重新安装才可以,如果用户报修建议用户送到维修站处理,也可以按照软件进行派单,派单时提醒维修站带好硬盘保护系统安装盘
Filed under: 技术归总
0 Comments
21051 Views
Written by 正冰 on 2009, July 3, 12:35 PM
今天想把自己的博客开启“高级URL Rewrite”功能,因为是linux主机,所以必然涉及到apache配置文件的修改:
进入apache配置文件目录
[root@linuxserver ~]# cd /usr/local/apache2/conf/
编辑httpd.conf
[root@linuxserver ~]# vi httpd.conf
查找模块是否已经启用,如果前面有#,则去掉
LoadModule rewrite_module modules/mod_rewrite.so
如果已经启用的话,PHP程序中依然无法使用URL Rewrite功能的话,那还需要修改一个地方,查找
Options FollowSymLinks
AllowOverride None
将None修改为All即可
重启apache服务
[root@linuxserver ~]# apache2 -k restart
进入程序后,看看是否已经可以用重新(rewrite)功能了,对了,记得把.htaccess传到你的网站根目录下
Filed under: 技术归总
0 Comments
23185 Views
Written by 正冰 on 2009, June 29, 12:52 PM
在火山互联申请了免费linux vps后,自己动手实践能力就要更为丰富了,本文为配置vhost.conf文件达到linux下apache的虚拟主机功能
环境:CentOS 5.2 + Apache 2.2.6 + PHP 5.2.5 + MySQL 5.1.3
首先要apache服务认得虚拟主机配置文件,则要修改/usr/local/apache2/conf/httpd.conf
在其底部加入:
Include "/usr/local/apache2/conf/vhost.conf"
定位到apache安装目录下的配置文件,/usr/local/apache2/conf/vhost.conf
打开后内容如下:
DocumentRoot /data/web/www/
ServerName www.vhost.cn
将它修改为我们所需要的:
NameVirtualHost *:80
ServerName is36.cn
ServerAlias www.is36.cn
DocumentRoot /data/web/www/
ServerName blog.is36.cn
ServerAlias www.blog.is36.cn
DocumentRoot /data/web/blog/
修改完成后重启apache服务即可:apache2 -k restart
(用ln做链接,类似windows下的快捷方式指向全局变量地址,就可以在终端任何地方输入apache2进行对apache服务的操作了)
ln -s /usr/local/apache2/bin/apachectl /usr/sbin/apache2
重启过程中如果出现如下情况需要去建立对应的blog文件夹:
[root@linuxserver ~]# apache2 -k restart
Warning: DocumentRoot [/data/web/blog/] does not exist
据网上资料还要在httpd.conf下加入如下的配置条文,本过程中未加入,后续观察:
Options Indexes FollowSymLinks
AllowOverride all
Order Allow,Deny
Allow from all
Options Indexes FollowSymLinks
AllowOverride all
Order Allow,Deny
Allow from all
附/usr/local/apache2/conf/extra/httpd-vhosts.conf 作为配置参考文件
#
# Virtual Hosts
#
# If you want to maintain multiple domains/hostnames on your
# machine you can setup VirtualHost containers for them. Most configurations
# use only name-based virtual hosts so the server doesn't need to worry about
# IP addresses. This is indicated by the asterisks in the directives below.
#
# Please see the documentation at
# http://httpd.apache.org/docs/2.2/vhosts/>
# for further details before you try to setup virtual hosts.
#
# You may use the command line option '-S' to verify your virtual host
# configuration.
#
# Use name-based virtual hosting.
#
NameVirtualHost *:80
#
# VirtualHost example:
# Almost any Apache directive may go into a VirtualHost container.
# The first VirtualHost section is used for all requests that do not
# match a ServerName or ServerAlias in any block.
#
ServerAdmin webmaster@dummy-host.example.com
DocumentRoot "/www/docs/dummy-host.example.com"
ServerName dummy-host.example.com
ServerAlias www.dummy-host.example.com
ErrorLog "logs/dummy-host.example.com-error_log"
CustomLog "logs/dummy-host.example.com-access_log common"
ServerAdmin webmaster@dummy-host2.example.com
DocumentRoot "/www/docs/dummy-host2.example.com"
ServerName dummy-host2.example.com
ErrorLog "logs/dummy-host2.example.com-error_log"
CustomLog "logs/dummy-host2.example.com-access_log common"
Filed under: 技术归总
0 Comments
34512 Views
Written by 正冰 on 2009, June 13, 7:16 PM
Filed under: 技术归总
0 Comments
28127 Views
Written by 正冰 on 2009, June 4, 8:54 PM
案例:red hat linux + windows 2003 es 双系统,通过修改grub配置文件修改改变默认启动顺序
描述:默认启动linux系统,如果要想启动windows 2003系统则需要在启动电脑后的几秒钟内(GRUB倒计时)按键盘上的上下选择键切入系统选择画面,现通过修改配置文件来作用
操作过程:
进入linux系统,进入终端,通过su命令将权限提升至root(或者之前就用root登陆,但是不大符合安全操作规范),编辑/etc/grub.conf配置文件,使用vi /etc/grub.conf
# grub.conf generated by anaconda
#
# Note that you do not have to rerun grub after making changes to this file
# NOTICE: You do not have a /boot partition. This means that
# all kernel and initrd paths are relative to /, eg.
# root (hd0,6)
# kernel /boot/vmlinuz-version ro root=/dev/hda7
# initrd /boot/initrd-version.img
#boot=/dev/hda
default=0
timeout=5
splashimage=(hd0,6)/boot/grub/splash.xpm.gz
hiddenmenu
title Red Hat Enterprise Linux ES (2.6.9-22.EL)
root (hd0,6)
kernel /boot/vmlinuz-2.6.9-22.EL ro root=LABEL=/ rhgb quiet
initrd /boot/initrd-2.6.9-22.EL.img
title Windows 2003 ES
rootnoverify (hd0,0)
chainloader +1
将
# title Red Hat Enterprise Linux ES (2.6.9-22.EL)
# root (hd0,6)
# kernel /boot/vmlinuz-2.6.9-22.EL ro root=LABEL=/ rhgb quiet
# initrd /boot/initrd-2.6.9-22.EL.img
与
# title Windows 2003 ES
# rootnoverify (hd0,0)
# chainloader +1
对调位置后重启后grub会默认引导进入windows 2003 服务器系统。
Filed under: 技术归总
0 Comments
44342 Views


