浏览模式: 标准 | 列表
Tag: vmware
Written by 正冰 on 2010, November 29, 10:03 PM
1:看你的esx版本
vmware -v
2:列出esx里知道的服务
esxcfg-firewall -s
3:查看具体服务的情况
esxcfg-firewall -q sshclinet
4:重新启动vmware服务
service mgmt-vmware restart
5: 修改root的密码
passwd root
6:列出你当前的虚拟交换机
esxcfg-vswitch -l
7:查看控制台的设置
esxcfg-vswif -l
8:列出系统的网卡
esxcfg-nics -l
9:添加一个虚拟交换机,名字叫(internal)连接到两块物理网卡,(重新启动服务,vi就能看见了)
esxcfg-vswitch -a vSwitch1
esxcfg-vswitch -A internal vSwitch1
esxcfg-vswitch -L vmnic1 vSwitch1
esxcfg-vswitch -L vmnic2 vSwitch1
10:删除交换机,(注意,别把控制台的交换机也删了)
esxcfg-vswitch -D vSwitch1
11:删除交换机上的网卡
esxcfg-vswitch -u vmnic1 vswitch2
12:删除portgroup
esxcfg-vswitch -D internel vswitch1
13:创建 vmkernel switch ,如果你希望使用vmotion,iscsi的这些功能,你必须创建( 通常是不需要添加网关的)
esxcfg-vswitch -l
esxcfg-vswitch -a vswitch2
esxcfg-vswitch -A "vm kernel" vswitch2
esxcfg-vswitch -L vmnic3 vswitch2
esxcfg-vmknic -a "vm kernel" -i 172.16.1.141 -n 255.255.252.0
esxcfg-route 172.16.0.254
14:打开防火墙ssh端口
esxcfg-firewall -e sshclient
esxcfg-firewall -d sshclient
15: 创建控制台
esxcfg-vswitch -a vSwitch0
esxcfg-vswitch -A "service console" vSwitch0
esxcfg-vswitch -L vmnic0 vSwitch0
esxcfg-vswif -a vswif0 -p "service console" -i 172.16.1.140 -n 255.255.252.0
16: 添加nas设备(a 添加标签,-o,是nas服务器的名字或ip,-s 是nas输入的共享名字)
esxcfg-nas -a isos -o nas.vmwar.cn -s isos
17:列出nas连接
esxcfg-nas -l
18: 强迫esx去连接nas服务器(用esxcfg-nas -l 来看看结果)
esxcfg-nas -r
esxcfg-nas -l
19:连接iscsi 设备(e:enable q:查询 d:disable s:强迫搜索)
esxcfg-swiscsi -e
20:设置targetip
vmkiscsi-tool -D -a 172.16.1.133 vmhba40
21:列出和target的连接
vmkiscsi-tool -l -T vmhba40
22:列出当前的磁盘
ls -l /vmfs/devices/disks
(转自网络)
Filed under: [VMware]
0 Comments
15956 Views
Written by 正冰 on 2010, November 29, 8:35 PM
近日我所管理的一台vmware esx 4.0服务器出了点状况,一开始是服务器的物理硬盘无响应引发黄色警告,我多次用VC连接esx服务器均已失败告终。我把esx的SSH服务打开,准备在shell下将esx的服务重新启动,但是担心出现esx上的所有VM都挂了,那么正在运行的业务将影响很大,因为没有做虚拟机对等HA,所以只能等夜里没有业务量的时候再停机维护。而等到了晚上当我再次登陆ssh发现系统在我输入root用户回车之后就停止了响应。因为VM都活着,为了不让esx强制重启导致VM出问题,我便登陆到所有的VM中进行关机操作,然后对esx进行强制关机并重启,最后逐个启动VM。
本次案例中VM不死的原因是VM的存储都是在EMC存储中的……
下面介绍一下如果可以登录到esx服务器中,在shell下可以对VM进行的操作。vmware提供了一个vmware-cmd的工具,位于/usr/bin/下,在任意目录直接执行即可。vmware-cmd是VMWARE管理虚拟机的工具,包括启动、停止、注册、快照、配置等。我们可以在VMware vSphere Client或其他第三方管理软件无法使用的时候管理我们的ESX或ESXi主机上的虚拟机设备。
[root@pcs zjsrueducn-web]# vmware-cmd
Invalid operation specified.
usage: vmware-cmd [options]
options:
-h, --help show this help message and exit
-v Verbose.
-q Quiet. Minimal output.
Connection Options:
-H <host> specifies an alternative host (if set, -U and -P must
also be set)
-O <port> specifies an alternative port
-U <username> specifies a user
-P <password> specifies a password
Server Operations:
/usr/bin/vmware-cmd -l
/usr/bin/vmware-cmd -s listvms
/usr/bin/vmware-cmd -s register <config_file_path>
/usr/bin/vmware-cmd -s unregister <config_file_path>
VM Operations:
/usr/bin/vmware-cmd <cfg> getstate
/usr/bin/vmware-cmd <cfg> start <powerOpMode='soft'>
/usr/bin/vmware-cmd <cfg> stop <powerOpMode='soft'>
/usr/bin/vmware-cmd <cfg> reset <powerOpMode='soft'>
/usr/bin/vmware-cmd <cfg> suspend <powerOpMode='soft'>
/usr/bin/vmware-cmd <cfg> getconfig <variable>
/usr/bin/vmware-cmd <cfg> setguestinfo <variable> <value>
/usr/bin/vmware-cmd <cfg> getguestinfo <variable>
/usr/bin/vmware-cmd <cfg> getproductinfo <product_info>
/usr/bin/vmware-cmd <cfg> connectdevice <device_name>
/usr/bin/vmware-cmd <cfg> disconnectdevice <device_name>
/usr/bin/vmware-cmd <cfg> getid
/usr/bin/vmware-cmd <cfg> getconfigfile
/usr/bin/vmware-cmd <cfg> getheartbeat
/usr/bin/vmware-cmd <cfg> getuptime
/usr/bin/vmware-cmd <cfg> gettoolslastactive
/usr/bin/vmware-cmd <cfg> hassnapshot
/usr/bin/vmware-cmd <cfg> createsnapshot <name> <description> <quiesce> <memory>
/usr/bin/vmware-cmd <cfg> revertsnapshot
/usr/bin/vmware-cmd <cfg> removesnapshots
/usr/bin/vmware-cmd <cfg> answer
Invalid operation specified.
下面介绍下主要的几个参数,其他自行测试。
vmware下的存储卷都是放在/vmfs/volumes/下,换言之,所有的虚拟机都是在这下面的。本例中约定一台red hat 5的虚拟机存储目录为/vmfs/volumes/cx4-240/rhel5-server/,rhel5-server.vmx是虚拟机的“配置文件”,配置信息都在里面,可以用编辑器打开。而我们对虚拟机的操作其实就是对配置文件的操作,配置文件如同一个“入口”。
约定:下方的xx代表rhel5-server.vmx
- vmware-cmd -l 显示注册的计算机
- vmware-cmd xx getstate 获得虚拟机的状态
- vmware-cmd xx start 启动或从暂停状态恢复
- vmware-cmd xx suspend 暂停虚拟机
- vmware-cmd xx reset trysoft 重置虚拟机
- vmware-cmd xx stop trysoft 关闭虚拟机
- vmware-cmd xx hassnapshot 查询虚拟机快照
- vmware-cmd xx creatsnapshot 创建虚拟机快照
- vmware-cmd xx revertsnapshot 恢复快照
- vmware-cmd -s register xx 注册虚拟机(添加到清单)
- vmware-cmd -s unregister xx 反注册虚拟机 (从清单中移除)
- vmware-cmd xx answer 回答提示
注意:在进行reset以及stop操作时候可选trysoft、soft以及hard方式,个人建议选择trysoft,这个可以先软性操作,如果不成功才会使用“暴力”操作,对保护VM是有好处的。
以上操作必须是在VM所在的ESX上进行,不然是无法成功执行的(除了将VM注册到当前ESX中)。因为执行权永远是在VM跑的宿主主机上的。
Filed under: [VMware]
0 Comments
22080 Views
Written by 正冰 on 2010, June 21, 7:11 PM
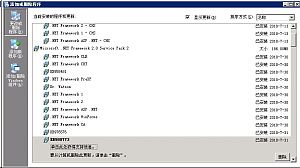
20100826更新:有些朋友遇到此问题可能是微软的某补丁造成的,解决这个补丁问题,请查看本文下半部分!卸载该补丁见下图:
记得将系统更新补丁功能调整为非自动,不然卸载后很快又会自动安装回去(经测试发现卸载后2天自动安装了),具体调整为:右键点击“我的电脑”->“属性”->“自动更新”->选择第三个选项->确认完成。
最近几天在我indows2003服务器上登陆安装在本机的VC(VirtualCenter server)总是遇到如下问题:
- 先弹出无法连接的错误框:“分析服务器"clients.xml"文件时出错。登录将继续,请联系系统管理员”。
- 点击确定继续弹出错误框:“VirtualInfrastructure.Utils.HttpWebRequestProxy的类型初始值设定项引发异常。”
- 再次点击“确定”后返回登录窗口:显示“连接失败”。
而安装在本机(windows 2008)的VMware vSphere Client却可以顺利登陆VC,这让我想起来之前遇到过在服务器上无法登陆,却可以在别的电脑上安装客户端登陆。那么问题应该出在客户端身上才是。我将现有的客户端进行了卸载,然后重新安装,无法解决。(这里我要告诉各位:windows服务器有个很大的特点,那就是遇到问题先重启试试看,或许就有效,而我却没第一时间去重启,囧~或许我重启一下,问题解决也不用走下面这么多弯路,当然,如果你重启后没效果,请继续往下看!)
上google查阅了错误信息,都是一篇在windows7下的解决方案的复制再复制。如果有朋友用windows7安装客户端遇到无法连接的问题,可以点击此处去看解决方案。
回到问题,虽然网上的资料没给我直接的解决之道,但是却给了我启发,问题很大程度上应该出在.net上。客户端是依赖微软的.net架构运行的,而现在的.net可能出问题了。我下载了清除之前.net版本的工具将本机的.net进行清除以便于我重新安装.net 2.0。
清理完成后重启,新的问题出现了。服务中的VMware VirtualCenter Management Webservices服务却没有启动,之前也出现过这个问题,每次手动启动即可。而这次多次尝试后依然没法启动,我变查看日志,查看与该服务相关的服务是否有问题。
与VMware相关的服务如下:
- SQL Server (SQLEXP_VIM)
- VMware vCenter Converter
- VMware vCenter Orchestrator Configuration
- VMware VirtualCenter Management Webservices
- VMware VirtualCenter Server
- VMwareVCMSDS
我依次启动了1、5服后,成功启动了4服务,也就说明,VC服务依赖数据库,而VC管理服务依赖于VC服务。
完成服务启动,我顺手打开VMware vSphere Client却弹出来初始化失败,忘记装.net 2.0了。将.net 2.0安装好后,再次登陆,稍等片刻,登陆成功!问题解决。
下半部分 来源:http://thinklog.blog.163.com/blog/static/71896182201061295159614/
使用vsphere 客户端连接vpshere 服务器时,跳出窗口,提示:分析服务器“X.X.X.X”的“clients.xml”文件时出错。从网上看到,是由于.NET 自动升级造成的。修改方法是删除升级的补丁(980773),然后将自动升级更改为“安装时提示我”,然后在升级时忽略掉这个升级包。
vSphere Client does not open on any Windows operating systems with the error: parsing the server "<servername>" "clients.xml" file
注:2010.6.9 微软更新了.net framework。可能是load .net framework的工作机制改变了,
Symptoms
· When trying to launch the vSphere Client you receive errors similar to:
Error parsing the server "<servername>" "clients.xml" file.
The type initializer for VirtualInfrastructure.Utils.HttpWebRequestProxy' threw an exception.
Resolution
You cannot use vSphere Clients prior to the Update 1 release, to access the vCenter Server or ESX hosts because of a Microsoft update that targets the .NET Framework (980773), released on June 9th 2010.
Perform one of these two options to correct the issue:
1. Download and install vSphere Client 4.0 Update 1 (build 208111) or Update 2 (build 258672) using method a or b below, depending on your environment.
a. To download and install the vSphere Client for ESX, ESXi (paid version), and vCenter Server:
i. Go the downloads site.
Note: The vSphere Client .exe is part of the ESX, ESXi, or vCenter Server download binaries.
ii. Click Download next to your ESX, ESXi, or vCenter Server edition.
iii. Log in with your VMware Account credentials.
iv. Click Yes to agree to the EULA.
v. Click the .exe link next to vSphere Client and Host Update Utility.
Note: You do not need to download the entire vSphere suite, only the vSphere Client.
vi. Follow the on-screen instructions to install the updated vSphere Client.
b. To download and install the vSphere Client Update 1 for ESXi (free version):
ii. Click Download.
iii. Log in with your account credentials, or register for free.
iv. Click Download next to vSphere Client and Host Update Utility.
v. Follow the on-screen instructions to install the updated vSphere Client.
2. Remove the MS update from your Windows operating system. The vSphere Client works after the update is removed.
Note: This affects Windows XP, Windows 2003, Windows 2008, Windows Vista, and Windows 7.
If the build number for your vSphere Client is 208111 or higher, then you have vSphere Client Update 1 or later, and should not be affected by this issue.
You can determine the version of vSphere Client by reviewing the build number located in the first line of a viclient.log file, located in %USERPROFILE%\Local Settings\Application Data\VMware\vpx on the system running the vSphere Client if the OS is Windows XP or 2003 and %USERPROFILE%\AppData\Local\VMware\vpx in 64 bit Windows 7 or 2008. Build 208111 or higher indicates you are using vSphere Client 4.0 Update 1 or later.
For example:
2010-05-19 03:08:58.508 Log for vSphere Client Launcher, pid=4756, version=4.0.0, build=build-208111, option=release
-------------------------------------------------------------------------------------------------------
当然如果你不想升级vSphere Client也不是没有其他办法。见下面方法,同样来自官方。
This issue is resolved in VMware vSphere 4.0 Update 1. Prior to this update, the vSphere Client is not supported in Windows 7 or Windows 2008 R2 and it does not run in Compatibility Mode. This issue may occur because of the .NET loading mechanism change in Windows 2008 R2 and Windows 7.
You can download and install the VMware vSphere 4.0 Update 1 from the download page.
If you cannot upgrade to VMware vSphere 4.0 Update 1, there are 2 possible workarounds. Perform one of these options:
· Bypass the normal .NET Framework loading mechanism.
Warning: This workaround is unsupported.
To bypass the normal .NET Framework loading mechanism:
1. Download the file system.dll. This file is typically located in %SystemRoot%\Microsoft.NET\Framework\v2.0.50727\ directory of a non-Windows 7 or Windows 2008 R2 machine with .NET v3.5 SP1 installed.
2. Copy the file to C:\Program Files (x86)\VMware\Infrastructure\Virtual Infrastructure Client\Launcher\lib.
Note: If the lib directory does not exist, create it.
3. Open VpxClient.exe.config in a text editor. The file is located at C:\Program Files (x86)\VMware\Infrastructure\Virtual Infrastructure Client\Launcher.
4. Add the following three lines to VpxClient.exe.config, just before </configuration>:
<runtime>
<developmentMode developerInstallation="true"/>
</runtime>
5. From Windows 2008 R2 or Windows 7 System Properties, click the Advanced tab > Environment Variables.
6. Create a new System variable called DEVPATH and assign the value:
C:\Program Files (x86)\VMware\Infrastructure\Virtual Infrastructure Client\Launcher\Lib
Note: For 32bit operating systems, replace Program Files (x86)with Program Files.
You can now launch vSphere Client from a Windows 7 or Windows 2008 R2 machine. You may have to right-click on the vSphere Client icon and choose Run as administrator.
Filed under: [VMware]
0 Comments
32273 Views
Written by 正冰 on 2009, October 19, 12:37 AM
随着虚拟化技术的越发热门,我也因为工作的需要,开始投入到这块热土之中(其实就是为了缓解硬件成本压力)。本文就服务器应用环境中vmware Infrastructure 3中的esx以及VC应用做一个简单的笔录。注:本文破解,仅为学习参考。
本次试验环境如下:
硬件:2台hp G3 DL360服务器,xen至强4核心处理器(2路双核),4GB内存,一台作为ESX平台,一台作为VC管理平台
软件:ESX 3.5 update 4 与 VIM 2.5 update 4 以及相对应的破解软件
安装破解过程:
至少一台服务器用于安装ESX3.5 U4,一台服务器用于安装VC2.5 U4 (系统为 windows 2003 企业版 sp2)
一、ESX3.5安装与破解
1、刻录ESX3.5光盘(VMware-ESX-3.5.0_Update04-153875.iso)并安装ESX(略)- 安装过程一般按照默认即可,安装完成后的ESX系统本身在启动后占用256M内存用以运维虚拟机
2、ESX 3.5 update4 主机破解
a、打开远程ssh功能:#vi /etc/ssh/sshd_config,将PermitRootLogin no改为yes,用#service sshd restart重启服务,这样就可以用root登录ESX了。
b、关闭iptables与firewall方便之后远程连接只用,当然,如果熟悉防火墙操作,可以通过添加规则放行通信端口
#service iptables stop
#chkconfig iptables off
#service firewall stop
#chkconfig firewall off
c、将ESX中/usr/lib/vmware/hostd目录下的libvimsvc.so和vmware-hostd改名,并将把破解文件libvimsvc.so和vmware-hostd上传到该目录中(可以用WinSCP从本机上传或者putty至ESX上用ftp下载)。
d、为两个文件设定执行权限 755
#chmod 755 vmware-hostd
#chmod 755 libvimsvc.so
e、接下来重新启动mgmt-vmware服务,即可破解成功:#service mgmt-vmware restart
f、接着需要重启下服务器完成破解:#reboot
(重启完成后稍等片刻,然后用vic连接esx服务器,并将授权指向VC中心,前提是VC中心已经破解过并且lic中各项功能正常)
g、至此VMware ESX Server3.5安装破解完毕。这样,已经可以使用,可直接使用客户端VIC(Virtual Infrastructure Client,可用浏览器访问ESX下载安装)进行管理。但是为了便于统一管理ESX并且做更多的服务器应用(比如多台ESX服务器,则要考虑HA与vmotion等功能)还要在一台windows 2003服务中安装集群化管理软件:Virtual Center2.5 (VC)
二、VIM(VC)2.5安装与破解
a、解压VMware-VIMSetup-2.5.0-U4-English.zip并安装到系统中,为保证安装成功,请依照默认安装至完成
b、浏览器访问esx3.5服务器所在ip下载vic(管理客户端)安装到本机或者直接在服务器上安装完毕
c、将破解文件覆盖到对应目录下的同名文件(搜索可得到)p2vsdk.dll p2vSupport.dll vpxd.exe
d、将license tool中设置证书为破解文件夹中的vmware.lic并保存,重启服务器
e、用VIC登陆VC中心,将验证模式设为本机验证,破解完成,60天消失。
本文仅为学习交流,如果你需要这个版本的破解文件用于学习,请留下邮箱,我会及时发送给你!
原来一直都是将破解补丁发送给留言的朋友,这样非常耗费双方的精力与时间,故我将相关资源打包放在115网盘,请有需要的朋友自行下载(如果超过31天会关闭下载,我会尽量及时续期,如果遗忘了而导致共享下载关闭,请联系我续期):
VMware-ESX-3.5.0_Update04-153875.iso
VMware-VIMSetup-2.5.0-U4-English.zip
Vmware+ESX++VC+U4+Crack.rar
(2010-11-8更新,之前压缩包内有dll病毒一枚,给大家带来不便,敬请谅解。感谢网友jindi提出。)
注意:如果你使用该破解补丁却无法破解成功,那么可能就是你的版本错误,请下载我提供的版本进行测试。
Filed under: [VMware]
39 Comments
65917 Views